TLDR: Instead of naming the next version of AppGini 6.0, it would be 22.0 as we’ll start using a new version numbering scheme that encourages rapid release cycles. More details below.
The previous scheme for versioning AppGini releases went something like this in most previous releases:
{super major release}.{major release}{minor release}
Let’s take AppGini 5.84 as an example: 5, the first digit, is a super major release number. So, moving from 5.xx to 6.00 means (as expected by me as AppGini developer and, my guess, also by most users) adding an enormous, paradigm-shifting change. 8 is a major release number, meaning that to move from 5.8x to 5.90, there must be at least 3 or 4 considerable new features. And finally, 4, the last digit, is a minor release number; version 5.85 is expected to have some bug fixes and minor enhancements over 5.84.
To be clear, the above is not some kind of an “officially declared policy” placed somewhere on our website. However, it’s been the way we used to number releases in most cases over the past 20 years.
This scheme has always imposed artificial barriers on the frequency of releases and which features get included into each one. It’s led to delays that we could have easily prevented had this scheme not been in place.
For example, take the very frequent case of making bug fixes and minor enhancements that we can’t call “new features”. This should be a minor release, right? But how many minor releases can we publish before we hit a wall? The above versioning scheme is forcing an artificial limit to how many minor releases we can make after a major release. Take the major release number 5.80: there can be only nine minor releases, 5.81 to 5.89, before a major release has to be published.
And because there are only nine chances to make minor fixes before having to release a major version, we had to delay minor releases in order to include as many fixes into each as possible. This has continually led to a delay of new features as we tended to “stash” them away till the next major release.
Even worse, combining a big list of fixes, enhancements and features into a single release to work around the version numbering limitations, often means a big number of issues could also be introduced. When the number of changes is small in a release, bugs are manageable and easier to discover, trace and fix. But with a large number of changes, this becomes a nightmare.
At the time of writing this post, the current version is 5.98. Now I feel really stuck, and have been so for a few months: We have a few fixes to make, but we have only one single minor release remaining: 5.99. After that, we have to move to … drum roll please … AppGini 6.0.
AppGini 6.0 is not a normal major release .. The expectation is that it should be a “world-changing” one, where there must be at least 3 or 4 huge new super features. Oh, but … but we have a couple of small new features ready to release? No, that has to wait till 2 or 3 huge features are also added. But what if we have some fixes to make after 5.99? Sorry, we’re out of luck, no can do! Maybe wait until 6.01 :/
See where this is going? We’ve kind of hit a wall here. This is not going to work, and AppGini 6.0 might have to wait for 4 or 5 months or even more. And this is unfair to users and to AppGini itself.
This is why we have to introduce a new version numbering scheme that removes those artificially imposed restrictions. One where we can make any number of changes of any kind (fixes, enhancements, minor or major new features), and once they’re ready, they get released.
So, this is the path we figured is the better way for AppGini to follow. We want users to be able to enjoy new features as soon as possible, and get issues fixed quickly, without having to wait for some unnatural versioning scheme. As a bonus, any potential bugs in new releases get fixed way quicker.
The new versioning scheme we’re going to follow begins with the year number (last two digits) follow by a dot followed by 2 digits. Thus, in the year 2022, version numbers would be 22.0, 22.1, 22.11, 22.12, and so on up to 22.99. In the following year, 2023, numbers would be 23.0, 23.1 and so on. This gives us the freedom to release up to 91 versions per year. We probably won’t make that many releases in each year, but a new version every couple of weeks would become possible.
We anticipate that this change will lead our valuable users to see more frequent new features, quicker bug fixes, and less surprising changes.
So many users tell us how much they like the hooks feature in AppGini. It allows almost unlimited ways to customize the generated AppGini apps; changing appearance, adding features, pages, rapid workflows, … etc. In fact, users really surprise and amaze me with the very creative things they do using hooks.
Due to the power and so many possibilities, however, hooks could sometimes feel overwhelming. There are lots of ways to do customizations. I’m trying to tackle that issue in this post. Let’s take as an example the phone field from the Customers table of the Northwind demo.
In this post, we’ll try to modify the phone column so that when clicking it (on a phone/tablet), it would dial the phone number.
This changes the phone number into a clickable link like this 123456789 that opens the phone dialer if you’re viewing the page on a mobile or tablet.
How many ways can this be done?
Turns out there are several ways to do this in AppGini. You could do it server-side through a mix of PHP and SQL code, or server-side through PHP and JavaScript, or client-side through JavaScript. There is even a pure SQL-only way that we’ll also discuss.
Before we begin our customization, let’s first configure the field in AppGini to display as text-only (no link) in the table view. This would make life much easier later!
In AppGini, select the concerned phone field, then go to the Media tab, select Link, then click the Configure button. From the dialog that would pop up, set the drop-down to No action and click OK.
Method 1: server-side PHP+SQL using tablename_init hook
This method modified the SQL query used to display the data of the table view. We want to format the phone field as an HTML dialer link. To do so, we need to edit the generated hooks/customers.php file (change customers to the actual table name in your case). We’ll change the code of the customers_init() hook like this:
The code above would modify the portion of SQL for the Phone field to display as a dialer link.
Method 2: client-side JavaScript in tablename-tv.js
This method involved modifying the phone text in the browser (client-side) using jQuery. We need to edit the hooks/customers-tv.js file (we should create that file if it’s not already there) like that:
In the code above, we’re doing these steps for each phone cell in the table view:
Retrieve the phone number from the cell.
Empty the cell.
Add a dialer link to the emptied cell using the phone number we retrieved in step 1.
Not quite as easy as method 1 maybe, but we’re demonstrating the various ways we could achieve our requirement 🙂
Method 3: client-side JavaScript in footer-extras.php or header-extras.php
Another way to modify the phone field via JavaScript is to edit the hooks/footer-extras.php or hooks/header-extras.php file (editing only one of them is sufficient). The code would look exactly the same as method 2 above, except that we should wrap it inside a <script> tag, like this:
This would work the same as method 2, yet, again, we’re demonstrating another slightly different way of doing what we want to do. A tiny drawback of this method, however, is that the JavaScript code would be executed in all pages of our app (because header-extras.php and footer-extras.php files are included in all pages), but it will only take effect in the customers table view. This would add a minuscule performance hit that is very safe to ignore, yet it’s just worth mentioning.
Method 4: server-side PHP+JavaScript in tablename_header hook
In this method, we’ll again use the same JavaScript code used in methods 2 and 3 above, but we’ll inject it server-side using the customers_header hook in the hooks/customers.php file:
function customers_header($contentType, $memberInfo, &$args){
$header='';
switch($contentType){
case 'tableview':
// --- our customization code goes here ...
ob_start(); ?>
<!-- same js code as methods 2, 3 above -->
<script>
$j(function() {
  $j('td.customers-Phone').each(function() {
    var cell = $j(this), phone = cell.text().trim();
    cell.html('');
    $j('<a href="tel:' + phone + '">' + phone + '</a>').appendTo(cell);
  })
})
</script>
<?php
$header = '<%%HEADER%%>' . ob_get_clean();
// --- end of our customization code.
break;
case 'detailview':
$header='';
break;
case 'tableview+detailview':
$header='';
break;
case 'print-tableview':
$header='';
break;
case 'print-detailview':
$header='';
break;
case 'filters':
$header='';
break;
}
return $header;
}
You could use customers_footer hook function instead. The code would be almost the same as above, except you should replace <%%HEADER%%> with <%%FOOTER%%>.
Yep, this is getting too complicated, I know. But we’re just showing one more method.
Method 5: SQL in dataFormats.cfg
This is perhaps the easiest way to do our requirement, and, as a bonus, it’s very easy to apply to multiple fields in multiple projects. Open the file C:\program files\AppGini\add-ons\dataFormats.cfg in a text editor (this path might var slightly based on where AppGini is installed on your PC) and append this line to the end:
Now, it’s very easy to format a field as a phone link in AppGini by selecting the field, going to the Data format tab, and selecting Phone link. No hooks needed 😀
One tiny caveat for this method: you should back up your customized dataFormats.cfg file before upgrading to a new version of AppGini to avoid overwriting your modifications. You should then re-apply your modifications to the new file after upgrade.
Summing up
As you see by now, AppGini hooks allow you to take many different approaches to achieve a modification. Each approach has its pros and cons. It’s up to you to choose the method you prefer. In this post I tried to compile as many methods into one place for you to compare them and decide which way to go. I hope you find it helpful 🙂
I was experiencing a worrying issue on one of my servers recently. It’s a web server that hosts some low traffic WordPress blogs for some customers. Recently, the disk I/O chart for the server showed sudden rise in disk read, as shown in the graph below.
Sudden increase in disk read operations, without any significant increase in traffic.
Investigating the issue
To investigate the issue, I connected to the server via SSH and ran the command pidstat -dl 20 which displays processes’ disk usage statistics, showing the full command for each process, and accumulating data for 20 seconds. This is very useful to capture sudden disk usage that is hard to capture otherwise.
The top process for disk usage turned out to be fail2ban .. Unfortunately I didn’t capture a screenshot at the time, but it was 2 or maybe 3 orders of magnitude higher than any other process!
fail2ban is a very common tool for blocking attackers. It works by monitoring various log files for suspicious access attempts, and blocks the attacker’s IP. fail2ban keeps a log of attacks it detected in the file /var/log/auth.log. By investigating that file (using tail and grep … etc), it turned out there were tremendous amounts of attacks to the SSH port. This seems to have been keeping fail2ban really busy parsing logs and banning huge numbers of IPs, causing the high disk load.
Fixing the issue, “outside the box”!
I decided to make use of DigitaOcean’s cloud firewall feature. It’s a free-of-charge feature that allows you to configure an external firewall protecting your server, offloading all the load from fail2ban to an external resource away from your own server (outside the box!)
The trick is that I don’t need to allow access to the SSH port (port 22) from any IPs except my own IP. Unlike web traffic, which should be allowed from all IPs so that users can visit your website, the SSH port is typically accessed from a single IP address in most cases.
So, I created 2 firewall rules to allow incoming (inbound) traffic from all IPs to ports 80 and 443 (which are the ports needed to allow users to visit the websites hosted on the server). And a firewall rule to allow inbound traffic to port 22 (SSH port) from a single IP address, my IP. See the screenshot below.
My IP is not a static one. So, it might change every couple of days, denying me access to the SSH port of the server. But this is not a concern at all. All I need to do is open my DigitalOcean dashboard > Networking > Firewalls > Select the firewall I applied to the server, and edit the SSH rule to change the IP address to the new one. I can then access the server easily.
I know the above is an additional step that I didn’t have to do before, but it’s a trivial step that takes less than a minute. Actually, it can even be automated via DigitalOcean API but I’m too lazy to do it at the moment 😀
So, did this fix the issue?
Here is the disk I/O chart one day after the above fix.
Disk I/O dramatically reduced after applying the SSH firewall rule.
This not only dramatically reduced disk I/O, but also overall server load:
For such a simple fix, this is an impressive gain. Cloud firewall is a free service provided by DigitalOcean. There is no reason not to take advantage of it to secure your server and greatly improve its performance.
DigitalOcean provides a very intuitive interface that makes it very easy to launch your servers in a few minutes. Compared to Amazon AWS and Google GCP, it’s much easier to understand and use. And pricing is also lower and much easier to understand. Sign up to DigitalOcean using this link to receive $100 of free credit to experiment with their awesome service.
I’m so delighted to announce the release of AppGini 5.80. The new version includes some exciting new features that will add more power to your apps and save you more time. This post takes a thorough look into those new features.
Calculated fields
Calculated fields are read-only fields that get populated
automatically with a value calculated from any formula you specify. The
formula for a calculated field must be a MySQL-compatible SQL query that
returns a single value. The value returned from the SQL query is saved
to the calculated field whenever the record containing that field is
accessed by users.
Calculated fields can be very helpful in numerous scenarios. For example, to automatically calculate and update the subtotal and total of an invoice, number of students enrolled to a course, average score of course, due date of an invoice (for example if you want to set a business rule to set a due date of an invoice to 15 days after issue date), most recent status of a shipment, flag overdue tasks, indicate if prospect customer should be contacted today … etc. There are endless possibilities to applying calculated fields.
To set up a calculated field, 1. set the field as read-only, 2. click the Calculated field tab, 3. check the option Automatically calculate the value of this field using the following SQL query, 4. finally, either type the SQL query in the text area, or click the Query helper button for a quicker and more precise query entry form.
The query helper window
The query helper window allows you to quickly insert various special code pieces into your SQL query. You can insert special variables, field names, SQL functions, or JOIN statements that join the table of the calculated field with one or more of its parent or child tables. This not only saves you time for manually typing these snippets, but also reduces typos and syntax errors.
For more details and example SQL queries for common scenarios, please refer to the calculated fields page in the online help.
Automatically copy child records when copying parent
You can enable this option from the Parent/Children settings window of the parent table. From there, select the child table from the grid at the left, and check the option Copy child records when copying parent. This would copy child records if the user copies the parent record by clicking the Save As Copy button. The lookup field in the copied child records would be automatically set to the new parent record. This is a very handy feature for scenarios like duplicating an order and all its order items, a product, and all the items in its bill of materials, … etc. It saves users the time to manually add child records from scratch.
Enhanced UI of group permissions page for faster editing
We made some time-saving enhancements to the group permissions page. Under the Admin area, open the Groups menu and click on View groups to see a list of configured user groups. Click on any of the groups listed to open its permissions page, where you can configure how the users under this group can access each table in your AppGini application.
What we added in this new release is a button with a checkmark to the right of each permission. Click this button to open a menu where you can select a permission value to apply to all tables at once. For example, if you want that user group to view only that group’s records in all tables rather than all records, click on Set all to Group, as shown in the screenshot to the left. This would select the Group option for all tables, saving you the time to select it manually for each table.
We did the same for tables as well. So, you can open the checkmark button to the right of any table, and select a permission value to apply to all permissions of that table.
Enhanced UI for ‘Specify output folder’ window
This is the window that appears when you click Generate PHP application in AppGini, asking you to specify the location where you want to generate your app files. We added 3 new buttons above the output path box in this window. The one to the left allows you to go one level up the currently specified folder, the Same as project file button changes the folder to the one where your AXP project file is saved, and the Last used folder changes the folder to the one you last used. This can save you some time browsing complex folder structures.
Enhanced file upload UI with minimum frustration!
We made some slight enhancements to the file upload UI, displaying file type/size errors before submitting changes, and allowing users to clear the upload field. This saves users the frustration of waiting for a large and slow upload to finish, then see a daunting error message about wrong file type or too large size. Now, they can know this instantly, before anything is uploaded.
Smart enhancements to auto-complete drop-downs
When you define a field as a lookup field, or an options list (with 5 options or more), it’s displayed to users in the detail view in the form of an auto-complete drop-down. User can type a few characters and see a list of matching items. As of AppGini 5.80, those searches return more relevant items first, and the matching part of each item is highlighted more clearly. For example, in the above screenshot, typing ran displays the items that begin withran first, followed by those containingran.
Developer/admin technical documentation
You can now add technical documentation for your application, and for each table and field. Technical documentation can be kept inside the project, or optionally included in the admin area of the generated app. HTML tags are allowed, so you can include formatted text and links, images, or even embed videos. You can also use Bootstrap 3 CSS classes.
API changes
Added the following functions to the JavaScript API (accessible in JavaScript code you add to hooks):
AppGini.repeatUntil({action, condition, interval}) this is an alternative to the standard JavaScript function setInterval() that repeats a callback function action every interval milliseconds and stops when condition callback function returns true.
AppGini.currentTableName() returns the current table name as a string.
Added the following functions to the PHP API (accessible in PHP code you add to hooks):
get_parent_tables($table_name) returns an array of parent tables for given child table.
curl_batch($handlers) executes provided array of cURL handlers asynchronously, ignoring server responses.
jwt_* this is a group of functions for handling JWT authentication to allow API functionality in future releases. We’ll provide a more detailed documentation as future releases become fully API-ready.
Other fixes and enhancements
Bug fix in Edit record ownership page.
Preserve table view settings when going back from TV using the top left (table name) link, just like when clicking Cancel/Back button.
Fixed: Changes to rich text (nicedit) are not detected by the Save changes button.
When saving CSV files, set the name to include date and time to make it easier to version CSVs if users are downloading them frequently.
Fixed: Prevent triggering of auto-loading for PHPMailer and Notification classes.
Added a UI hint for lookup fields that have custom queries.
Fixed a potential run time error when resetting a custom query to default one for a lookup field.
Fixed: Configured data format for field should take priority over default date/time formatting in both table view and detail view.
Fixed a bug that lead to failure generating some files when some special UTF8 characters are used in table/field captions.
If you are an existing Pro user, you can log in to the download area, where you can download the latest Pro version if you bought a pro/upgrade license one year ago or later, or order an upgrade license in case your current license is older than one year.
In some application scenarios, you might meet the usage case where you want one or more user groups to be able to access a table only if it’s displayed as a child table, but not directly as a master table.
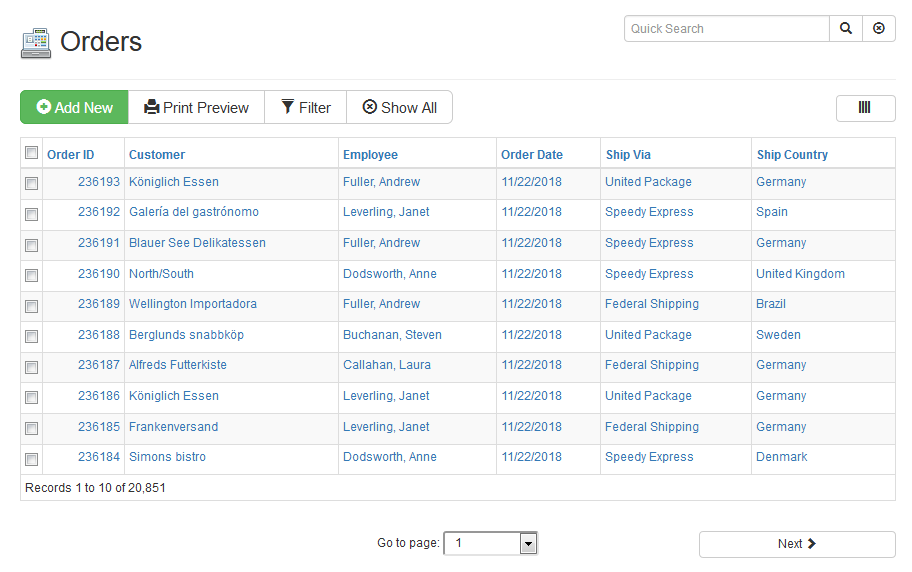
Let’s take an example from the Northwind demo. Let’s say you have a users group named CustomerSupport and you don’t want that group to access the orders table unless they are accessing the orders of a specific customer. To clarify, you don’t want this group to directly access all orders like this:
This is the table view of the Orders table of the Northwind demo app. We want to prevent CustomerSupport users group from accessing this page.
However, you still want the group, when they choose a specific customer, to be able to access his orders like this:
The detail view of a specific customer, showing a list of their orders below. We want CustomerSupport users group to be able to access orders only through this page.
So, here is how to do this through a simple AppGini customization.
STEP 1/3: Remove the table link from the homepage
The first step would be to remove the link to the orders table from the homepage if the current user belongs to the CustomerSupport group. This is how the homepage for the Northwind demo looks like before any customization:
A screenshot of the homepage of Northwind app, highlighting the link to orders table that we want to remove for CustomerSupport group.
We’ll add the code for removing the link in hooks/footer-extras.php:
1
2
3
4
5
6
7
8
9
10
11
<?php
$mi=getMemberInfo();
// hide the table only if the user belongs to this group
if($mi['group']=='CustomerSupport'){
?>
<script>$j(funtion(){
$j('#orders-tile').remove();
})</script>
<?php
}
?>
Change CustomerSupport in the above code to the actual name of the concerned group. And change orders to the actual name of the table you want to remove the link for. If there are multiple groups you want to hide the link from, change the 4th line to something like this:
STEP 2/3: Hide the table link from the navigation menu
The next step is to hide the link to orders table from the navigation menu for the CustomerSupport group. Here is how the navigation menu looks like by default:
The navigation menu of Northwind app. The link to orders table (highlighted) is what we want to remove for specific groups.
To remove that link, we could use a JavaScript statement like this:
1
$j('.nav a[href^=orders_view]').remove();
It basically tells the browser to remove the link to the orders_view.php page (which is the page showing the orders table) from the navigation bar. We could place that code line in the same code block we wrote in step 1 to avoid rewriting the if condition that checks for the user group. So, here is how our code in hooks/footer-extras.php should look like now:
1
2
3
4
5
6
7
8
9
10
11
12
<?php
$mi=getMemberInfo();
// hide the table only if the user belongs to this group
if($mi['group']=='CustomerSupport'){
?>
<script>$j(funtion(){
$j('#orders-tile').remove();
$j('.nav a[href^=orders_view]').remove();
})</script>
<?php
}
?>
STEP 3/3: Prevent accessing the page unless it’s in embedded mode
So far, we’ve been using JavaScript code to hide the link to orders from a specific group. This basically hides the link, but doesn’t prevent the users from that group from accessing the orders table if they know how to type the link in the browser navigation bar.
In this step, we’ll actually add server-side code for effectively preventing the CustomerSupport group from accessing the orderstable, even if they manually type the link in the browser.
For doing this, we’ll use the orders_inithook function in hooks/orders.php. All we need to do is check if the current user belongs to the CustomerSupport group and if so, display an access denied message and return false. Returning false from the init hook prevents rendering any part of the table.
But, wait a minute! Do we really want to prevent CustomerSupport users from accessing the orders table entirely? Maybe we still want them to access the detail view of orders when they are viewing the info of a customer, and seeing a list of his orders in a child tab (see the second screenshot in this post). In order to allow this, we’ll need to check if the orders page is in embedded mode or not. Embedded mode is when a table is accessed from the child tab of a parent table, allowing displaying the detail view, but not the table view.
And if a user from CustomerSupport tries to access the orders page directly, this is what they’ll get:
Users from CustomerSupport group trying to directly access the orders table would now get an access denied error.
However, they’d be able to access orders of a specific customer by opening the customer details, scrolling down to his orders and clicking on any order to open in embedded mode.
I hope this was helpful. Please feel free to post questions, enhancements and comments below.
AppGini provides a multiple choice option list field, which is a handy way to allow users of your app to select multiple values from a list, for example to add tags/labels for a record. This is how it works:
Tags field above allows users to select multiple values from an auto-complete drop-down.
And this is how to configure it in AppGini:
Creating a multiple-choice option list in AppGini. To accommodate a potentially large number of items, the field data type should be Text or similar.
There is a problem with the above approach however. If you want to modify the list (to add new options, edit, or remove existing ones), you have to do this in AppGini, by opening the project file, editing the list of options, regenerating, and re-uploading your application files to the server.
The above is doable, but it’s a lot of pain. There is an easier method fortunately, which is to include a list of options in a file inside the hooks folder. If you create a file in hooks with the special name of {tablename}.{fieldname}.csv (where {tablename} is the name of the concerned table, and {fieldname} is the name of the multiple-choice field, for example products.tags.csv), your AppGini app would use the contents of that magic file to populate the drop-down list when users are filling in that field. It would simply override the list of options configured in AppGini.
Editing this special file is much easier than having to edit the list of options in AppGini, regenerate and re-upload the entire app. The file contents should be a list of options, separated by double semi-colons ;;, just like the format used for option lists in AppGini. For example:
Still, editing that file requires accessing the server through FTP, shell, or some online file editor. It’s much easier than re-uploading the entire app, but not easy enough 😀 … Moreover, it still requires admin access to the server. Non-admin users won’t be able to edit that list on their own.
What if you could store the list in another table that can be easily configured to allow some users/groups to add, edit and delete entries? We’ll see how to do this now!
STEP 1: Add a new table to your project
Let’s create the tags table, which would allow users to add/edit product tags, which would show up in the multiple-choice Tags field in products table. It’s a very simple table with just 2 fields: id, and tag:
The tag field should be set as a varchar or similar data type. It will be used to dynamically populate tags drop-down field of the products table.
Next, generate the application, making sure to overwrite existing files.
STEP 2: Configure the hooks for updating the options list file
Let’s now add code so that whenever a use adds, edits or deletes records from the tags table we created in step 1, the options list file would automatically be updated. First, let’s define the update_tags_list() function that would retrieve tags from the table, and use them to populate the options list file. In the generated hooks/tags.php file, append this code block to the end of the file:
We’re ready now to upload the updated app to the server. Make sure to overwrite existing files. If you visit the app in your browser, the new tags table would automatically be created. You can confirm by visiting the tags table and adding a few records:
The tags table, populated with some tags. These will be automatically used to populate the drop-down options list of the Tags field of the products table.
STEP 4: Begin populating your multi-choice list by adding records to the table
Any records added to the tags table should now instantly update the Tags list in the products table:
The options listed when populating the Tags field are now dynamically populated from the tags table.
Your app users can now control the tags list through the tags table if you give them permission to edit it. And this is done instantly without editing the project in AppGini, or uploading any files, or manually editing any files.
Possible enhancements
The above solution has room for enhancement that I’ll leave to readers 🙂
Consider the scenario where you added the tag dark colors for example to a product, then decided later to edit that tag in the Tags table and renamed it to darks … This will not automatically update the tag for products that already have it. Same if you decide to delete a tag from the Tags table. If that tag is already assigned to a product, it will stay assigned to it despite being deleted from Tags.
To fix this, if needed, you should add code to the tags_before_update() hook to get the old value of the tag and perform a search and replace operation to the products.tags field.
Similarly, to handle deleting tags, you should add code to the tags_before_delete() hook to also search for that tag in products.tags and clear it.
Alright, maybe I’ll handle this in some future post if there is enough demand for it 🙂
I hope that helps 🙂 Feel free to post any feedback or questions below.
Many-to-many relations (also known as N:M relations) is a way of describing the relationship between two entities/tables where each one could have, or own, or be related to, many items of the other. To clarify this, let’s use the example from WikiPedia, books and authors. An author can write one or more books, and a book can be written by one author or a team of authors.
Now, if we had a 1:N relation instead, for example, if and author can write many books, but a book can be written only by a single author rather than a team of authors, we’d have a simple relationship between books and authors tables. In AppGini, we’d simply create a lookup field in books table to link it to authors as shown below.
The lookup field ‘author’ field inside ‘books’ table tells who is the author of a book. However, this has a limitation where a book can have one and only one author.
A naive approach to many-to-many relations: author1, author2, …
In the AppGini screenshot above, we created a lookup field in the books table to link it to an author. But that’s a single author. What if the book was authored by 2 or 3 authors? A first thought that might jump to our minds in this case is to add 2 more lookups in the books table for author2 and author 3:
Trying to handle the case where a book has more than one author by adding more lookup fields to the ‘books’ table.
But the above approach has several limitations…
First, it’s not scalable. What if we got a new book that has 5, or 10 authors? Yes, thatcanhappen! We’d then have to go back to the project file, add a few more lookup fields, regenerate the app and re-upload it to our web server. Although AppGini makes this process smooth, it’s still a lot of work to add a new book entry. We’d better get our database structure correct at the beginning and keep schema changes to a minimum when users are actually using our app in production environments.
In addition, this makes it harder to perform searches. What is we want to find books wrote by a specific author? We’d then have to look for books whose author1 is x, or author2 is x, or author3 is x … Have 10 author lookup fields in your books table? Good luck with searching through that!
A smarter approach: intermediate (or junction) tables
To avoid the above issues, a much better approach is to create an intermediate table that has a lookup field to books, and another one to authors. This way, if a book has 5 authors, it would have 5 records in the intermediate table, where the book lookup field points to the same book, while the author lookup field points to a different author in each of the 5 records.
An author can write one or more books, and a book can be written by one author or a team of authors. To describe this relationship correctly, we need to have an intermediate (or junction) table that links books to authors. Diagram source: Wikipedia.
Here is how this would look like in AppGini:
‘books_authors’ is an intermediate table to represent the many-to-many relationship between ‘books’ and ‘authors’ by having 2 lookup fields, one to ‘authors’ and another to ‘books’.
Is this a scalable approach? Certainly. Although it’s unlikely to have a book written by 1000 authors, there are other examples where this might be true. Consider a college course taken by thousands of students. A ‘courses_students’ intermediate table can very easily handle this by adding a record for each student enrolled in the course.
Does this make it easier to search? Yep. If you go to the ‘books_authors’ table and search for a specific author, you are searching only one field, the ‘author’ field. And you’d get all books written by that author, whether she wrote it alone, or with other authors.
Furthermore, we could now use the parent/children feature in AppGini so that when we’re viewing an author, we can see a list of books she wrote below the author details, and when we’re viewing a book, we can see the list of authors of that book below the book details.
I hope that helps. Please feel free to post any questions below.
I recently received a very interesting question from an AppGini user regarding implementing full-text searches in AppGini apps. The user had a table containing millions of records, and normal search operations on a text field took too long (about 1.5 minutes according to the user). When he tried adding a full-text index on that field, and using full-text search, search time dropped dramatically to several milliseconds. Unfortunately, AppGini doesn’t yet support full-text searches. So, in this post, we’ll try to address that using hooks.
Full-text search in MySQL/MariaDB databases lets users run full-text queries against character-based data in a table. You must create a full-text index on the table before you run full-text queries on that table. This can be done in phpMyAdmin, or any other MySQL admin utility, by executing a command similar to this:
1
ALTER TABLE`customers`ADD FULLTEXT INDEX`Address`(`Address`)
The above would add a full-text index on the ‘Address’ field of the ‘customers’ table. Full-text indexes can be used only with MyISAM tables. (In MySQL 5.6 and up, they can also be used with InnoDB tables.) Full-text indexes can be created only for CHAR, VARCHAR, or TEXT columns. If you’re using MariaDB, check full-text compatibility here.
Having created a full-text index on a field, we’d like now to change normal search filters performed on that field into full-text searches. Normal search using the LIKE operator looks something like this:
1
`customers`.`Address`LIKE'%place%'
This might get very slow for TEXT fields in huge tables that have millions of records. Applying a normal index on the field won’t fix this since normal indexes work only on the first 765 bytes of the field. If you’re searching beyond those first 765 bytes, you’re out of luck with normal indexes. But full-text indexes come to the rescue in this scenario. The full-text search clause in that case would look something like this:
The question now is how to apply the above search clause in your AppGini app? We’ll walk through one method that is easy to apply using hooks. First, we’ll add 2 new functions to the hooks/__global.php file. We can add them anywhere, but, for simplicity’s sake, let’s append them to the end of the file:
The above defines 2 functions: use_full_text_search() and reapply_pre_full_text_filter(). The first function should be called inside the init hook for our table, and what it does is prevent our AppGini application from performing normal search with LIKE operator on our full-text field. This is done by removing any defined LIKE searches on that field.
The second function should be called inside the footer hook. Its purpose is to restore the removed LIKE search so that it’s still visible and configurable in the filters page. So, basically, we’re removing the filter before our AppGini app constructs the SQL query, and then adding it back after the query has been executed.
Applying the above 2 functions in our table hooks
After defining the functions above in global hooks, we should now use them in our table. Let’s continue assuming that our table is named ‘customers’, and our full-text field is named ‘Address’. We also need to know the index (order) of that field in the table, as defined in AppGini. For example, if that field is the fifth field, its index is 5, as shown in this screenshot:
This is how to retrieve the index of a field from the AppGini project.
Now that we know all the necessary information, let’s open the hooks/customers.php hook file in our preferred text editor, and let’s add this line to the customers_init() hook before the return statement:
‘5’ is the index of the field as explained above, and then we pass the field name, including the table name. Next, let’s add this line to the customers_footer() hook before the return statement:
1
$footer=reapply_pre_full_text_filter($footer);
That’s all we need to do. Now, whenever any user defines a LIKE or NOT LIKE filter on the ‘Address’ field, our code would automatically change that to a full-text search on the field, dramatically reducing the query time.
Limitations/possible enhancements
This is a quick and experimental post that I wrote hastily in response to a user question. There are several limitations for the above code listed below. The purpose of the post is to act as a starting point for anyone who’d like to perform full-text search in AppGini, rather than a fully-working solution. Here are the limitations I’m aware of:
The above code won’t work unless the field has a full-text index applied to it.
If all the data in the concerned field has a length of less than 756 bytes (which translates roughly to 255 characters if using Unicode encoding), it’s much simpler to apply a normal index and avoid all the above procedure. The above method works best with longer fields.
The above code assumes only one single full-text field per table. If you have more than one field, you might need to modify the code to adapt to all fields, but I’ll leave this as an exercise to you 😉
The above code probably works fine if you define only one filter. It might not work when defining multiple filters, but I haven’t investigated this. Might revisit this post later and fix that, or if you have suggestions, please feel free to post your comment below.
Moreover, the above code won’t work with quick search. I welcome contributions for applying full-text search to quick search 🙂
Importing CSV data to AppGini is pretty easy using the CSV import page in the admin area. However, if the CSV file is mal-formatted, it might be partially imported, or not at all. A pretty easy way to check and validate your CSV file if it’s not importing correctly is to upload it to CSVLint. After uploading, click the ‘Validate’ button to see validation results. This should tell you if the CSV file has structure errors that prevent it from being parsed correctly when importing it, and suggests a fix for it as well.
Warning: CSVLint allows you to either specify the URL of the CSV file you want to validate, or to upload it. If you specify a URL, CSVLint assumes that this URL is public and publishes it! If you have sensitive data in your CSV file, consider installing the linter, which is open source, on a private PC/server instead.
Here is an example report showing validation errors for a CSV file that I received from a user — Data omitted from the screenshot for privacy.
CSVLint is a quick and easy way to validate CSV files. If you see errors like the above, try fixing them by clicking Download Standardized CSV button, then retry importing the fixed CSV file to your AppGini application.
I got a question from an AppGini user on how to hide specific columns in the table view based on the user group. This blog post explains how to do this through hooks.
As an example, we’ll modify the orders table of the Northwind demo to hide the ‘Customer’ column for ‘Suppliers’ and ‘anonymous’ groups, while keeping it visible for all others, as demonstrated in the following 2 screenshots:
Orders table, with all columns visible, including the ‘Customer’ column.
Orders table, with the ‘Customer’ column hidden for specific user groups as we’re going to see how in this tutorial.
Now, we could do this in a trivial way through JavaScript, or in a more robust way through server-side PHP code. The JavaScript method would work until some ‘geek’ user figures out how to use the browser console to unhide the column. The more robust server-side method is a more secure way that users can’t circumvent. And that’s what we’re going to explain here.
Step 1: Copy a few lines from the generated {tablename}_view.php file
{tablename} in our example is ‘orders’. So, let’s open the generated orders_view.php file in a text editor and search for a line starting with $x->ColWidth. We should copy that line and the following ones until the line starting with $x->SelectedTemplate. For the Orders table of Northwind, these lines read:
Step 2: Paste the copied lines into the {tablename}_init hook
For our example again, that would be the orders_init hook in the generated hooks/orders.php file. After pasting the code we copied in step 1, that hook function would read:
Note that we added an extra indentation level (via Tab or spaces, whichever you prefer) while pasting the code. This is for a reason that will be revealed below.
Step 3: Replace ‘$x’ with ‘$options’, and ‘templates’ with ‘hooks’
After pasting the code in step 2, we need to change $x into $options and templates into hooks:
Step 4: Remove the references to the column we want to hide
In our example, we’d like to hide the ‘Customer’ column. This is the second column in the table view. To remove references to it in the init hook, we should remove the second item in each of the 4 arrays present in lines 2-5 in our code:
If we need to hide more columns, we should do the same for each.
Step 5: Add a conditional check for user group
So far, we’ve hidden the ‘Customer’ column header for all users. We need to wrap our code inside a conditional check to hide the column only for specific user groups:
We’ve added a line listing the user groups we want to hide the ‘Customer’ column from: ‘anonymous’ and ‘Suppliers’. Then we wrapped the code we pasted in the previous steps inside an if check. This would cause the code for hiding the column to apply only if the user belongs to any of the groups we specified. Note that because we double-indented the pasted code in step 2, it’s now properly formatted after wrapping it inside the if block.
We’ve now finished all the necessary edits for the init hook. In the following steps, we’ll make a copy of the table view templates to remove the ‘Customer’ table from there as well.
Step 6: Copy the table view templates to the hooks folder
The table view templates are stored in the templates folder, and named {tablename}_templateTV.html and {tablename}_templateTVS.html. For our example, these are orders_templateTV.html and orders_templateTVS.html. We should copy those 2 files to the hooks folder. We’ll then edit the copied templates to remove the ‘Customer’ column.
To clarify this step a little more, we now have 2 sets of templates for the table view of the orders table: the default one in the templates folder would apply to all groups except ‘anonymous’ and ‘Suppliers’, and the copied one inside hooks that would apply to those 2 groups.
Step 7: Edit the copied templates to remove the column
Let’s open the copied hooks/orders_templateTV.html file in our text editor. It should read:
By now, we’re done! If a guest (anonymous) user, or a user from the ‘Suppliers’ group visits the orders table, they won’t be able to see the ‘Customer’ field in the table view. For all other user groups, the ‘Customer’ field would be visible.
Further improvements
The above steps hide the ‘Customer’ column for ‘anonymous’ and ‘Suppliers’ groups, but only in the table view (this includes the print view as well). However, if users from those 2 groups have access to the detail view, they would be able to see the hidden ‘Customer’ column. So we need to hide it from the detail view as well, but we’ll leave that to another future post.


![[Specif output folder] window](https://cdn.bigprof.com/screencasts/specify-output-folder-dialog.png)