Adding custom "batch actions" that apply to multiple records
When you select one or more records in the table view, a "More" button is displayed above the table. If you click that button, it opens the batch actions menu. This menu displays some actions that you can perform on the records you selected -- see the screenshot below. Which actions show up in the menu depends on the permissions you have.
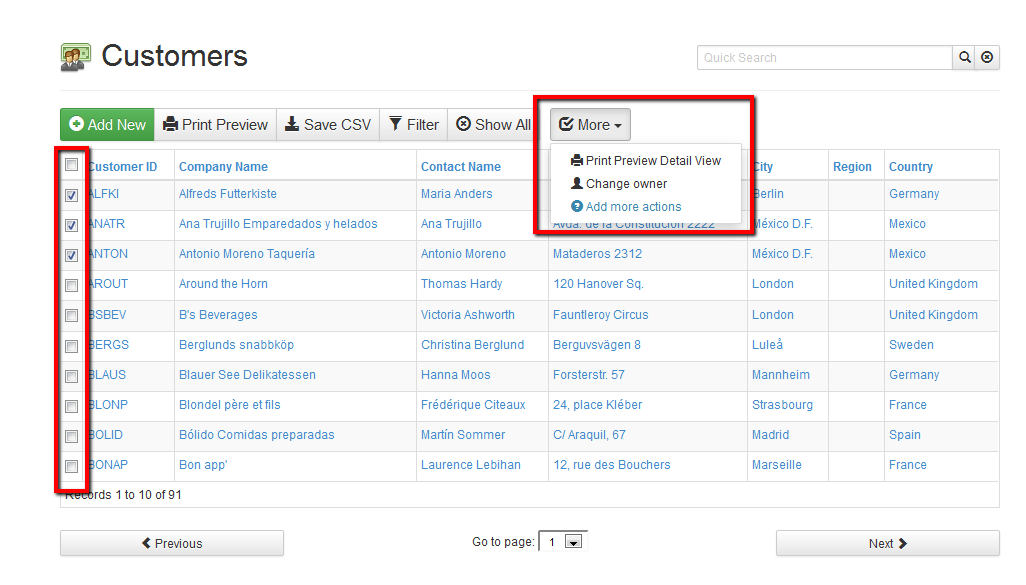
For example, if you are an admin, you can change the owner of the records. If you have delete permissions, and you've enabled mass-delete in AppGini, you can delete the records.
Adding custom batch actions
TIP!
Don't have the time or programming knowledge to write your own batch actions? We have a plugin for that now! Check our Mass Update plugin. This plugin allows you to add as many batch actions as you want in a very short time, without writing a single line of code.
You can define your own batch actions inside the body of the tablename_batch_actions() function in the generated hooks/tablename.php file. In this function, you just define the name of the batch action. You can add the details and functionality of the batch action in another place that we'll come to in a moment. The tablename_batch_actions() hook works by returning an array of actions. Your AppGini application receives this array and displays the actions in the "More" menu.
When a user chooses an action from the "More" menu, your AppGini application calls the javascript function linked to that action. The name of this javascript function is part of the data in the array we mentioned above (the array returned from the tablename_batch_actions hook).
You should define the javascript function in the file tablename-tv.js inside the hooks folder. This function could do anything you want to apply to the selected records. It could open a new page, or make an ajax request, or any other action you wish to do. There is no specific implementation that you have to follow here. We'll discuss an example action with all these details below so you can use it as a guideline.
This diagram explains how this all works.
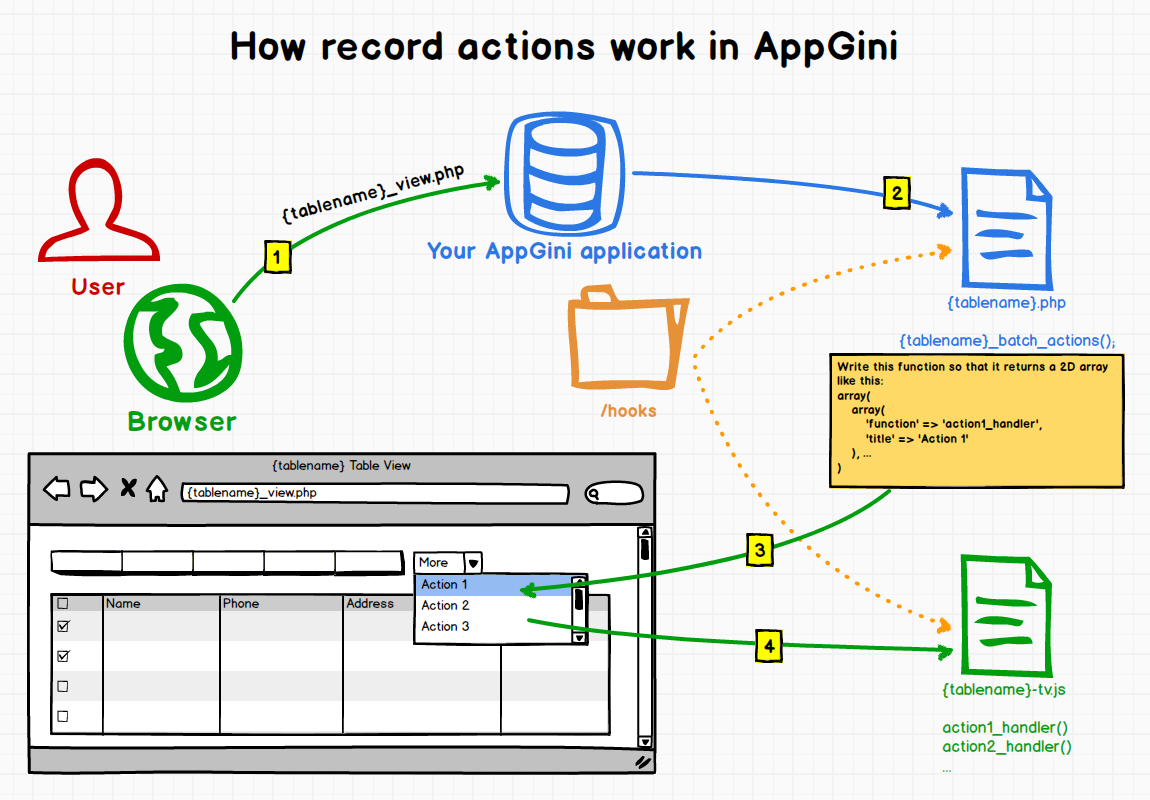
So, here is the sequence of events:
- The user opens the table view of a table in your AppGini application.
- The application calls the hook function
tablename_batch_actions(). This is where you define the extra actions users can choose. - This function returns an array that describes one or more actions and the name of the javascript function to call if the user selects an action. The application adds those actions to the "More" menu.
- If the user selects one or more records, opens the "More" menu, and chooses one of the actions you defined in the
tablename_batch_actions()hook, the application passes the IDs of the selected records to the javascript function you associated with that action.
Example: Adding a batch action to print mailing labels for selected records
Back to the customers table example:
Let's say you want to add a batch action to print mailing labels for the selected customers. Here is how you can do it: the first step is to add the action into the customers_batch_actions() hook. To do so, we'll open the hooks/customers.php file, we should find our hook function:
The function above is empty (we call this a skeleton function). We need to add our action to it. So, let's modify it to read:
function customers_batch_actions(&$args){

    return [
        [
            'title' => 'Print mail labels',
            'function' => 'print_mail_labels',
            'icon' => 'th-list'
        ]
    ];
}
The code above tells our application to display an extra action in the "More" menu labeled "Print mail labels". If a user chooses that action, the application will pass the IDs (primary key values) of the selected records to a javascript function named print_mail_labels(). We didn't write this function yet. We'll do so in a moment. But before we do so, let's take a look on the "More" menu after adding the code above.

We've specified an icon name in the code above. So, the icon shows up to the left of the new action. For a full list of supported icon names, please refer to the Bootstrap Glyphicons list. All icons there have a name like "glyphicon-xyz" ... just use the xyz part in our hook code to specify an icon.
TIP!
To display the batch action only to users from a specific group, you can add a conditional check in the hook function. For example, to display the action only to users in the 'Admins' group, you can add the following code:
The next step is to define the print_mail_labels() javascript function. This is the function that our application would call if the user clicks the "Print mail labels" item in the menu. We should write this function in the customers-tv.js file in the hooks folder ... If you don't find that file in the folder, just create it there .. the format is tablename-tv.js (where tablename is the name of the concerned table). If the file exists in the hooks folder, it's loaded in the table view. So, whatever javascript code you put there will get executed in the table view of the concerned table.
Let's write our code in the customers-tv.js file as follows:
function print_mail_labels(table_name, ids) {
    alert("IDs selected from " + table_name + ": " + ids);
}
Here is what happens when we choose the "Print mail labels" action after adding the above code:
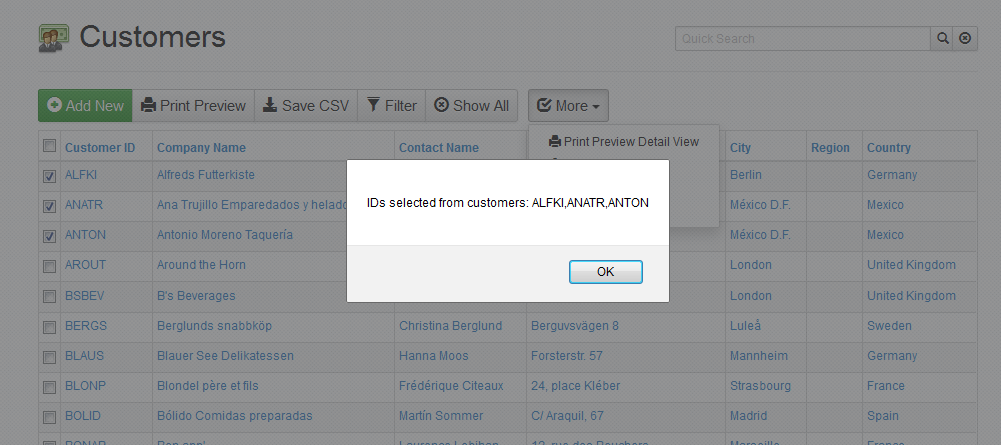
The above code simply displays the parameters passed to the print_mail_labels() function. When you write the javascript function, you should write it so that it receives two parameters. The first one is a string containing the table name (this is useful if you have one function for handling multiple tables), and the second one is an array of selected record IDs (primary key values of selected records).
Let's change the javascript code to do something more useful. We'll pass the selected IDs to a PHP script to display the mail labels for those records. So let's rewrite the print_mail_labels() function as follows.
function print_mail_labels(table_name, ids) {
    /*
      we'll open the mail labels page in a new window
      that page is a server-side PHP script named mail-labels.php
      but first, let's prepare the parameters to send to that script
    */
    var url = 'mail-labels.php?table=' + table_name;
    for(var i = 0; i < ids.length; i++){
        url = url + '&'
            + encodeURI('ids[]') + '='
            + encodeURIComponent(ids[i]);
    }

    window.open(url);
}
Finally, let's write the server-side mail-labels.php script. Based on the code above, we assumed the location of this script to be the main folder of our AppGini application. Here is how this script might look like:
<?php
    /*
      Including the following files allows us to use many shortcut
      functions provided by AppGini. Here, we'll be using the
      following functions:
        makeSafe()
            protect against malicious SQL injection attacks
        sql()
            connect to the database and execute a SQL query
        db_fetch_assoc()
            same as PHP built-in mysqli_fetch_assoc() function
    */
    include(__DIR__ . "/lib.php");

    /* receive calling parameters */
    $table = $_REQUEST['table'];
    $ids = $_REQUEST['ids']; /* this is an array of IDs */

    /* a comma-separated list of IDs to use in the query */
    $cs_ids = '';
    foreach($ids as $id){
        $cs_ids .= "'" . makeSafe($id) . "',";
    }
    $cs_ids = substr($cs_ids, 0, -1); /* remove last comma */

    /* retrieve the records and display mail labels */
    $eo = ['silentErrors' => true];
    $res = sql("select * from customers " .
               "where CustomerID in ({$cs_ids})", $eo);
    while($row = db_fetch_assoc($res)){
        ?>
        <b><?php echo $row['CompanyName']; ?></b><br>
        <i>C/O <?php echo $row['ContactName']; ?></i><br>
        <?php echo $row['Address']; ?><br>
        <?php echo $row['City']; ?><br>
        <?php echo $row['Region']; ?>
        <?php echo $row['PostalCode']; ?><br>
        <?php echo $row['Country']; ?><br>
        <br>
        <br>
        <hr>
        <?php
    }
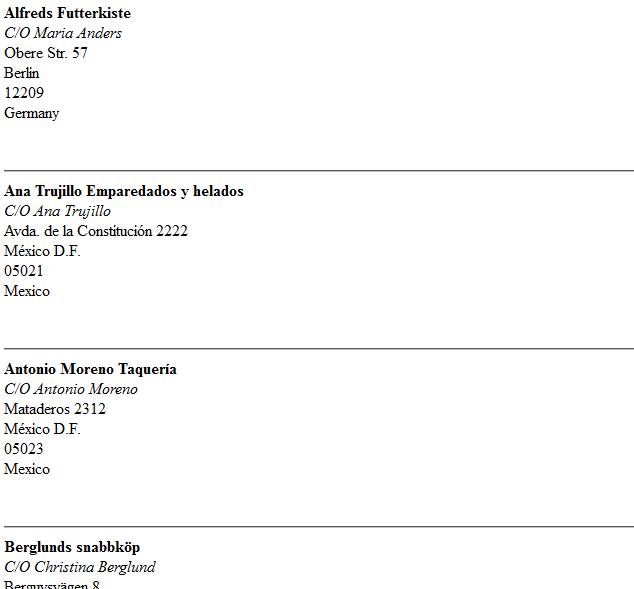
Here is a sample of the output from the above script.
We chose to implement the action handling using a javascript function to allow a lot of flexibility for customizations. In the above example, we prepared some parameters and opened a new page. You might instead wish to do something in the background by using an Ajax request without opening a new page. It's all up to you.
Note: The above example used the Northwind project, which is the same one used for our online demo. You can download the Northwind project file, application files and the sample data to experiment on your own.
TIP!
Don't have the time or programming knowledge to write your own batch actions? We have a plugin for that now! Check our Mass Update plugin. This plugin allows you to add as many batch actions as you want in a very short time, without writing a single line of code.